Tuesday, April 16, 2013

Teriyaki Chicken Lo Mein

Have you seen the prices in the grocery store lately? I mean seriously - I can remember when milk cost under $2 a gallon. Now we're paying $4.59 for a half-gallon of organic milk. I'm starting to wonder if it would be cheaper to buy a cow.

I have a cheap dinner for you that can feed a crowd. It makes a lot of servings, it's delicious, and it's cheap to make. This would be great for an asian-themed dinner party, potluck, or just a quick dinner to put together on a weeknight.

Get ready folks - it's Teriyaki Chicken Lo Mein. Can I just tell you that I LOVE that this recipe calls for Instant Ramen Noodles and you get to throw away those gross, MSG-filled packets that come with them? You're making your own sauce, kids. No MSG - just some sauces, spices, and homemade goodness.


Here's what you do.

Teriyaki Chicken Lo Mein
Adapted from Cooks Country
Serves 6 (at least)

3/4 cup soy sauce
1/4 cup rice vinegar
1 1/2 tablespoons grated fresh ginger
1/3 cup sugar
1 tablespoon cornstarch
3 1/2 cups water
4 (3 ounce) packages Instant Ramen Noodles, broken into large pieces, seasoning packets discarded
1 (16 ounce) bag coleslaw mix
2 boneless, skinless chicken breasts, cut crosswise into 1/4 inch thick slices
1 tablespoon vegetable oil

1. Simmer soy sauce, vinegar, ginger, sugar, and cornstarch in large saucepan over medium-high heat, whisking often, until thickened, 2 to 3 minutes. Transfer half of soy sauce mixture to large bowl and reserve. Add water to saucepan with remaining soy sauce mixture and return to boil. Add ramen and cook, stirring occasionally, until tender, about 4 minutes. Off heat, stir in coleslaw mix. Cover and keep warm.

2. Pat chicken dry with paper towels. Heat oil in large skillet over medium-high heat until just smoking. Add chicken and cook until no longer pink, about 1 minute per side. Transfer chicken to bowl with reserved soy sauce mixture and toss to coat. Transfer noodles to platter and top with chicken. Serve.


This is a must-try. Next time I'm serving it with iced green tea and some fortune cookies for a light dessert.

Thanks for stopping by!
xo, Stephanie

Sunday, April 14, 2013

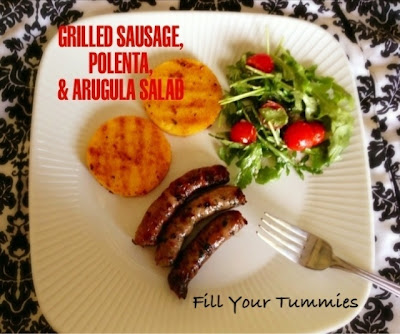
Grilled Sausage, Polenta & Arugula Salad

It was 80 degrees here the other day...in April! It's not like we live in the south. This type of weather this time of year is strange but it's a welcome surprise after the winter we have had. Warm weather means open up the barbecue and grill something good.

I pulled out some cookbooks and began my search of a recipe for the grill. I love America's Test Kitchen and am so glad I turned to their Quick Family Cookbook because now I have an awesome recipe to share with you. It's a complete dinner and you and your family will love it. Don't be scared by the polenta like I was. It was so good!


Here's what you do.
Grilled Sausage, Polenta, and Arugula Salad
Adapted from "The America's Test Kitchen Quick Family Cookbook"
Serves 4 - 6

1 ounce Parmesan cheese, grated (1/2 cup) 
1/3 cup extra-virgin olive oil 
2 tablespoons red wine vinegar 
1 teaspoon minced fresh rosemary 
1 garlic clove, minced 
Salt and pepper 
1 (18-ounce) tube precooked polenta, sliced 1/2 inch thick 
1 1/2 pounds sweet or hot Italian sausage (6 to 8 links), pricked all over with fork 
12 ounces cherry tomatoes, halved if small or quartered if large 
5 ounces (5 cups) baby arugula 

1. Whisk Parmesan, oil, vinegar, rosemary, and garlic together in large bowl and season with salt and pepper to taste. Brush 3 tablespoons of dressing over polenta; reserve remaining dressing for salad. 

FOR A GAS GRILL: Turn all burners to high, cover, and heat grill until hot, about 15 minutes. Leave all burners on high. 

2. Clean cooking grate, then repeatedly brush grate with well-oiled paper towels until grate is black and glossy, 5 to 10 times. Place sausages and polenta rounds on grill. Cook, turning as needed, until sausages and polenta are lightly charred on all sides and sausages are no longer pink in center, about 6 minutes. (Handle polenta gently to avoid breaking.) Transfer sausages and polenta to platter. 

3. Drizzle polenta with 2 tablespoons of remaining dressing. Add tomatoes and arugula to remaining dressing and toss to coat; season with salt and pepper to taste. Serve sausages and polenta with salad.

NOTE: I used a ring of thin sausage and cut it into pieces because it's just what I prefer but feel free to use whatever you prefer. The polenta turned out to be amazing. I'm not going to lie - I was a little afraid of using it but I'm glad that I did. Did you know that polenta is gluten-free and fat-free?

Hope you enjoy this one. It's a great way to celebrate the warmer weather and heat up your grill!

xo, Stephanie

Thursday, April 4, 2013

Enchilada Casserole

I have a small confession to make. I am in LOVE with a blog that's not even my own. I actually look forward to the posts and they always tend to make me smile. This fabulous site is Iowa Girl Eats. I've never been to Iowa but if I were to ever meet Kristin, I'd tell her that her recipes and photography are phenomenal. Her "Friday Favorites" e-mails are my guilty pleasure. Go visit her site and make sure you subscribe to her posts. She is so unbelievably creative.

Casseroles are my new best friends. I love the easy one-dish clean up and I love that a lot of them give me some down time while they are baking. They let me do other things around the house as dinner comes together in a snap.

I recently saw this post on Iowa Girl's website and like the others that I have tried from her, this did not disappoint! Lazy Girl's Enchilada Casserole had my name written all over it. I'm not really too lazy but I like when something doesn't require a lot of work but produces awesome results. This casserole falls into this category. It literally took me under 40 minutes start to finish (and including baking time).


Here's what you do.

Lazy Girl's Enchilada Casserole
Adapted from Iowa Girl Eats
Serves 4-6
1 pound chicken breasts, cut into bite-sized pieces
salt and pepper
1 cup enchilada sauce (red or green, depending on your preference. I used red for this recipe.)
1 cup low-fat sour cream
3/4 cup jarred salsa
1 cup frozen corn, thawed (I used canned corn because it's what I had on hand)
4 ounces diced green chilies
12 white corn tortillas, torn into bite-sized pieces
1 cup shredded cheddar cheese
sliced green onions or cilantro, for garnish (optional)

1. Preheat oven to 350 degrees. Season chicken with salt and pepper then saute in a large, nonstick-sprayed skillet over medium-high heat until cooked through. Remove to a plate to cool slightly.

2. In a very large bowl add enchilada sauce, sour cream and salsa then whisk to combine. Add cooked chicken, corn, and green chilies then stir to combine. Add corn tortillas then stir to combine.

3. Spray a 9×13″ casserole dish (or 2 smaller baking dishes) with nonstick spray then scoop mixture inside. Top with cheese then bake for 25 minutes, or until golden brown and bubbly. Let rest for 5 minutes before serving. Top with green onions or cilantro and salsa, if desired.


All I have to say is YUMM! This one was a winner. It satisfied my weekly craving for Mexican food and it was so easy to put together. You can serve this with rice, a salad, or even some black beans on the side.

Thanks for stopping by!

xo, Stephanie


Monday, April 1, 2013

Butter-Braised Vegetables

I'm on a veggie kick lately. There is something about the start of spring that makes me want to eat vegetables ALL-OF-THE-TIME! Someday I plan to live in an area where farmer's markets just aren't on weekends and only 6 months of the year. Doesn't that sound nice? Lately the fruits and vegetables at the supermarket have been all sort of blah. I haven't seen anything interesting that has caught my eye.

However, carrots, brussels sprouts, and radishes always seem to be available. I recently saw a vegetable dish from Cook's Country that definitely caught my eye. It included all of these vegetables and I couldn't wait to make it.

This is a great vegetable dish that is so flavorful (and it's not even really drenched in butter). It would go excellent with anything from a grilled piece of steak to a pork chop. We had it with ham and it was awesome! The butter is very subtle and the title of this dish is misleading. The vegetables are braised in mostly chicken broth.


Here's what you do.

Butter-Braised Vegetables
Adapted from Cook's Country
Serves 6
2 cups low-sodium chicken broth
4 Tbsp unsalted butter
1 pound carrots, peeled and sliced 1/4 inch thick on bias
1 pound radishes, trimmed and quartered
12 ounces brussels sprouts, trimmed and quartered
salt and pepper
2 Tbsp minced fresh chives

1. Bring broth to simmer in Dutch oven over medium-low heat. Whisk in 1 tablespoon butter until melted. Add carrots, radishes, Brussels sprouts, 1 teaspoon salt, and ½ teaspoon pepper to pot. Cover and cook, stirring occasionally, until vegetables are tender, 11 to 14 minutes. Using slotted spoon, transfer vegetables to serving dish.
2. Remove all but ¼ cup broth from pot. Whisk remaining 3 tablespoons butter into remaining ¼ cup broth in pot until melted and slightly thickened and pour over vegetables. Season with salt and pepper to taste. Sprinkle with chives. Serve.


This will be my go-to vegetable dish - spring, summer, fall and winter! Well, at least until I'm living in a place where farmer's markets are all year round!

Hope you enjoy!

xo, Stephanie